Author: hazzasw (Page 1 of 2)

Free Inquiry Blog Post #8 – Car Mastery


I finally found a painter who can paint the new door for $350. I had messaged countless people online and called up multiple garages, so after all that searching, this felt like the best deal I could get. It’s also reassuring that the painter had a lot of online reviews seeing other people’s experiences made me feel confident that I wasn’t getting overcharged and that the work would be done well.

The painter said the paint will take about a month to fully settle since I didn’t blend it in with the other panels. Also, because my car color is metallic, the paint cost a little extra.

Overall, the final cost came to only $500, which still keeps my car under market value and with a clean title. Honestly, I feel like I scored a really good deal. Big thanks to ChatGPT and Reddit for helping me think through whether to buy the door or not!

I guess I now have a nice looking car that i bought for under market value. Yippee!!!!!!!

Free Inquiry Blog Post #7 – Car Mastery

Update!


I found a garage selling a brand-new OEM door for only $150. It’s unpainted, but it’s in perfect condition (the door in the back ^), which honestly makes it a really tempting option. At first, my plan was to just take a door off another car with the same color code, but that idea started to feel more complicated and stressful, especially after running into the wrong color code before.

Then I started thinking, what if I just buy this new door, swap the internals from my old one, and pay a painter to match the color? It might cost a bit more overall, but it seems like a safer and more reliable solution than hunting for the exact color online or taking risks with a used door. I’m starting to realize that sometimes it’s better to take a step back and think creatively instead of sticking to the first plan.

Now I just need to figure out how much painting will cost and whether I want to do it myself or hire someone, but at least it feels like I finally have a solid plan that could actually work.

Free Inquiry Blog Post #6 – Car Mastery

For my free inquiry, I looked into fixing a dent on my car that was already there when I bought it. The damage wasn’t reported, so the car still had a clean title, which is a big reason why I decided to buy it under market value. Before purchasing, I did some research and found out that replacement doors for my car are widely available, and it would only cost me under $700 to fix, which made the risk feel worth it.

I also researched on Facebook Marketplace for Mitsubishi Lancer parts, hoping to find a door that exactly matched my car’s color. However, I ran into an issue because my car’s color code is quite rare, which made it difficult to find a perfect match.

Originally, I thought I could just take the door off this car and fit it onto mine. However, when I went to see it in person, I realized the color code for that car was A32, while mine is A31 (aw man sucks!!!!).

In my next post, I’ll talk about whether I end up finding another door for my car or not.

Weekly Reflection Blog Post #8

Assisted technology-supported inclusion is all about making learning easier and more accessible for everyone. Universal Design for Learning (UDL) focuses on designing tools and lessons so all students can use them from the start, and many technologies today include helpful features like captions and voice tools, although some can still be confusing to use. Tools like screen readers and text-to-speech are really useful because they help students who have trouble seeing or reading by turning text into audio. Immersive learning like VR and AR also makes learning more engaging by letting students experience things in a more interactive way, which can help them understand better. Overall, these technologies not only improve accessibility but also make learning more interesting, collaborative, and personalized for different students.

Image from classvr.com

I also looked into specific tools like text-to-speech and adaptive keyboards. Text-to-speech tools read text out loud, which can really help students who struggle with reading or have learning disabilities by making content easier to understand. Adaptive keyboards are designed for people who have difficulty using standard keyboards, with features like larger keys or customized layouts to make typing easier. Both of these tools show how technology can be adjusted to meet different needs and make learning more inclusive for everyone.

Image from facingdisability.com

The keyboard above is an adaptive keyboard designed to help people with limited mobility use a computer more easily. It has large touchpads and simplified controls, making it easier for users to navigate and interact without needing a traditional keyboard.

We also talked about web accessibility in class and used the WAVE tool to check how accessible different websites are. I tested my own website and got a score of 4.8, which showed me that while it’s somewhat accessible, there are still improvements I can make to make it better for all users.

Car Mastery 5 – Free Inquiry

After last week’s frustrating end, I was relieved to find that swapping out the faulty T-tap connectors did the trick. The new ones I ordered arrived and once I secured the connections properly, the backup camera finally came to life on the head unit display. Definitely a satisfying moment after all that troubleshooting.

With the camera actually working, the next step was getting the angle right. I had my friend sit in the car and give me real-time feedback while I adjusted the camera mount until we were both happy with the view. We then took it to an empty parking lot to fine tune it further, lining up the on-screen guidelines with the actual parking lines on the ground to make sure reversing would be accurate.

Finally we tackled cable management. All the wires are now fully tucked behind the weather stripping throughout the interior, keeping everything completely hidden and out of sight. No exposed cables, no mess, it looks completely clean like it came that way from the factory.

This week felt like the payoff for all the frustration from last week. The backup camera is fully installed, properly angled, and neatly hidden away. The Lancer is coming together nicely.

Weekly Reflection Blog Post #7

Before this week I hadn’t really thought much about the difference between gamification and actual game-based learning. Turns out there’s more to it than just making something “fun.”

Minecraft Education was a talking point for last class and it’s a good example of game-based learning done right. It’s not just slapping points and badges onto a worksheet as students are actually building, problem solving, and collaborating inside the game itself. The learning is engraved into the experience rather than bolted on top of it. That distinction matters more than I initially realized.

What stuck with me most is that engagement and learning aren’t always the same thing. A student can be fully engaged in a game and still not be retaining much. The best gamified tools seem to be the ones where getting something wrong still leads somewhere useful such as where the game pushes you to try again rather than just cutting you off or punishing you for mistakes.

I wish Minecraft Education was a thing back when I was in grade school as I would have had way more fun in classes with my friends. Instead I remember us hiding tabs in Computer class trying to play Minecraft secretly behind the teachers day. Fun times.

Weekly Reflection Blog Post #6


In last class we talked about different educational technology models, including SAMR, TIM, COI, and TPACK framework.
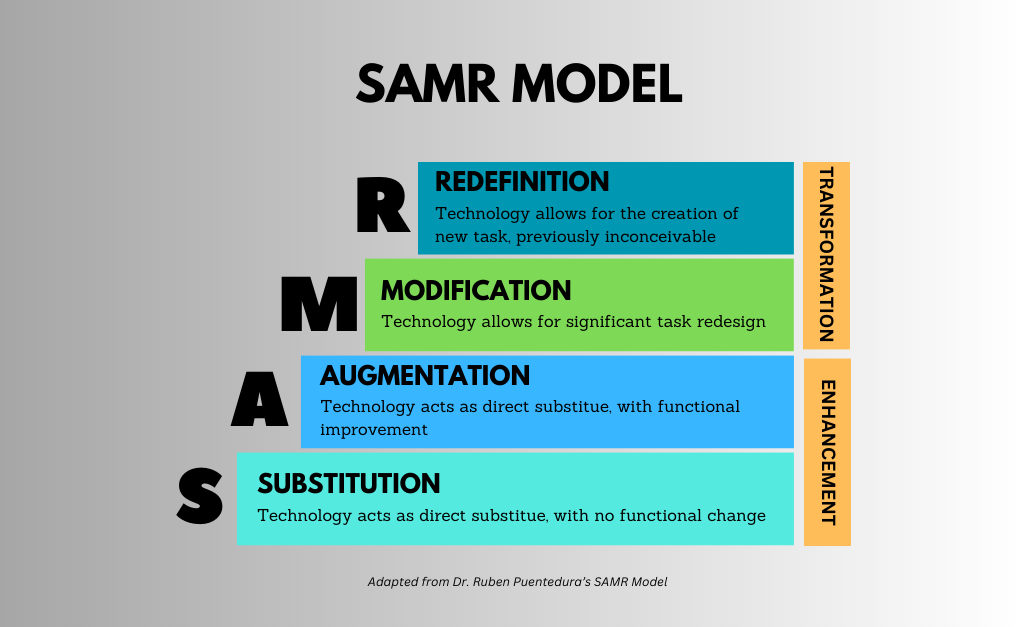
SAMR Model

SAMR is a model that explains how technology can be integrated into learning. It starts with Substitution, where tech simply replaces traditional tools, and moves up to Redefinition, where technology enables completely new learning experiences. The idea is to progress through these levels so technology isn’t just used the same old way but actually enhances learning.


Technology Integration Matrix

TIM is a framework that connects technology use with meaningful learning environments. It looks at how technology supports active learning, collaboration, and student engagement at different levels. Instead of just saying whether tech is used, it evaluates how effectively it improves learning experiences.


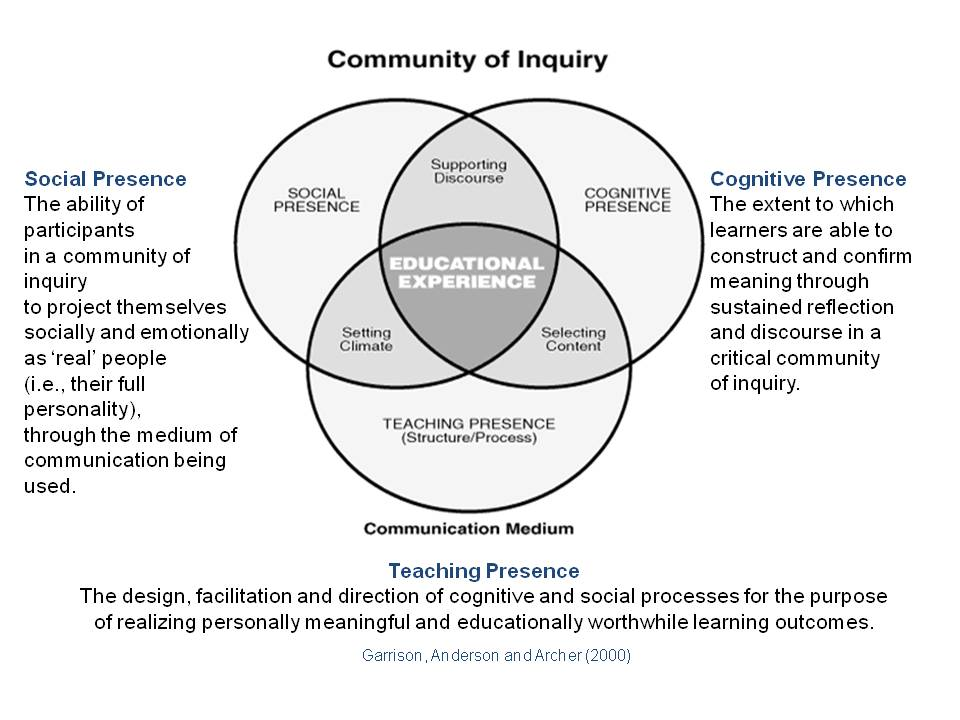
Community of Inquiry framework

The Community of Inquiry model focuses on three key ideas: cognitive presence, social presence, and teaching presence. Cognitive presence is about critical thinking, social presence emphasizes collaboration, and teaching presence involves guiding learning. Together, these elements aim to create a learning environment where students engage deeply with ideas and each other.


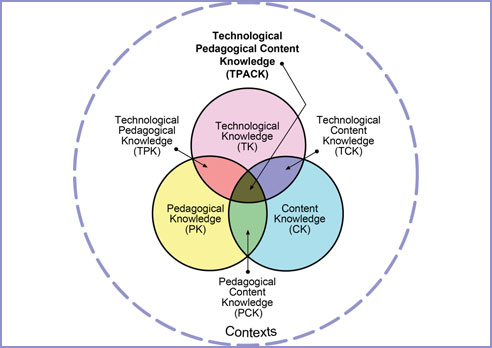
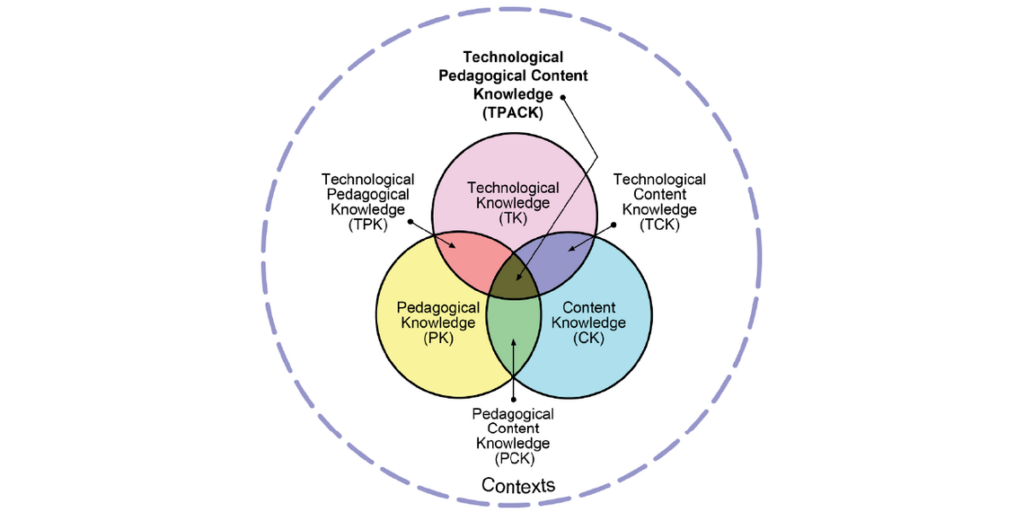
Technological Pedagogical Content Knowledge framework

TPACK is a model that balances technology, pedagogy, and content knowledge. It explains that effective teaching happens when technology supports learning and fits with good teaching strategies and subject content. The model highlights that all three areas must work together for technology to truly enhance education.


My personal favorite model is probably the SAMR Model because it makes tutoring math easier by using technology such as visualizations and change over time graphs really make understanding math far more easier and does not just limit the subject to symbols and numbers.

Weekly Reflection Blog Post #5

I watched the following workshops listed below for last Friday’s class:

  • Digital Classroom Overview K-12
  • Getting Started with Artificial Intelligence K-12

In the Digital Classroom Overview K-12 session, the presenter introduced a variety of online learning resources designed to support teaching across grade levels. I learned how digital textbooks, interactive tools, and multimedia content can be used to engage students and provide flexible learning options. It was also encouraging to see UDL strategies reflected in the resources through features like text-to-speech and adjustable reading levels, supporting accessibility and diverse learning needs in line with the BC Curriculum.

While watching the recorded AI literacy and cybersecurity session, The presenter explained that AI is a tool based on data and probability rather than a search engine, meaning it generates responses instead of pulling fixed answers. She emphasized that results can vary and should be evaluated critically since AI is not always accurate. We also discussed risks like deepfakes and misinformation, and the importance of using AI responsibly and following school guidelines. Overall, the session highlighted both the benefits and limitations of AI in education and the need for digital literacy.


The biggest feature that stood out to me between the two classes was the topic finder in Gale Power Search, especially the wheel visualization. It felt like such a unique way to search for something, allowing me to visually explore related ideas and narrow topics in an intuitive way. This approach seems helpful for brainstorming and discovering resources in a more interactive way compared to traditional search methods. I can see how tools like this would make research more engaging and efficient for students and I wished I had used it during my time in high school.

Car Mastery – Free Inquiry 4


For this post, I moved on to installing a backup camera on my Lancer. This was definitely a bigger challenge than the head unit because it involved running wires from the back of the car all the way to the dash. I used the video linked below as an installation guide.

I picked up a license plate mount to secure the camera in the ideal spot above the plate, giving me a clear view when reversing. Once mounted, I realized the cable from the camera was a bit too short to reach the dashboard, so I had to extend it using some spare wire I found in my dad’s garage. Using a T-tap connector, I joined the wires and made sure the connection was secure before moving on.

Next, I connected the main long cable to the reverse light so that the camera would turn on automatically when I put the car in reverse. Then came the tricky part: running the cable along the length of the car. I had to carefully tuck it under trim panels and along the edges of the interior, making sure nothing would get pinched or damaged while driving.

After running it to the new head unit that i had installed I tried to to put my car in reverse however i got no signal from the backup camera. I quickly tried to diagnose it and figured out that there could only be two reasons as to why. Either my T-Tap connections were not properly secured or the backup camera itself was faulty.

Thus I made sure my T-Tap connections were secured and then gave it a try, yet it did not work. I don’t think the backup camera itself was the issue as i tested it using a voltmeter so I would assume that the T-Tap i ordered off amazon were faulty sadly. Since it was getting late i opted to order some better quality T-Tap and try the installation next week.

At least my head unit was working so it wasn’t a complete loss this week!

Car Mastery – Free Inquiry 3


For this post, I finally got to the part I’ve been waiting for: installing the Head Unit on my Lancer. Below is the video i used as a guide throught the installation process.

Installing the new head unit started with removing parts of the dash to access the stock unit. First, I had to open the glove box and loosen two screws to get it out of the way. Once the glove box was removed, I tackled a plastic trim piece that runs along the dash. It was attached with clips, so I carefully used a pry tool to pop it off without breaking anything.

Next, I had to remove the hazard switch module, which was held in place by three screws. Once that was out, I carefully pried out the center console to create enough space to reach the head unit. This part was a little tricky, but taking it slow and making sure nothing was forced helped me avoid any scratches or broken clips.

Finally, I got to the head unit itself. It was held in by four screws, and after removing them, the old unit came out cleanly. I disconnected the cables from the old head unit and installed them in the new head unit. The installation process was quite easy as all the cables was plug and play. Below is a picture that I used to plug in the correct cables.

In the next post I will test the head unit and try to install the backup camera hopefully.

« Older posts