Category: Free Inquiry

Free Inquiry Blog Post #8 – Car Mastery


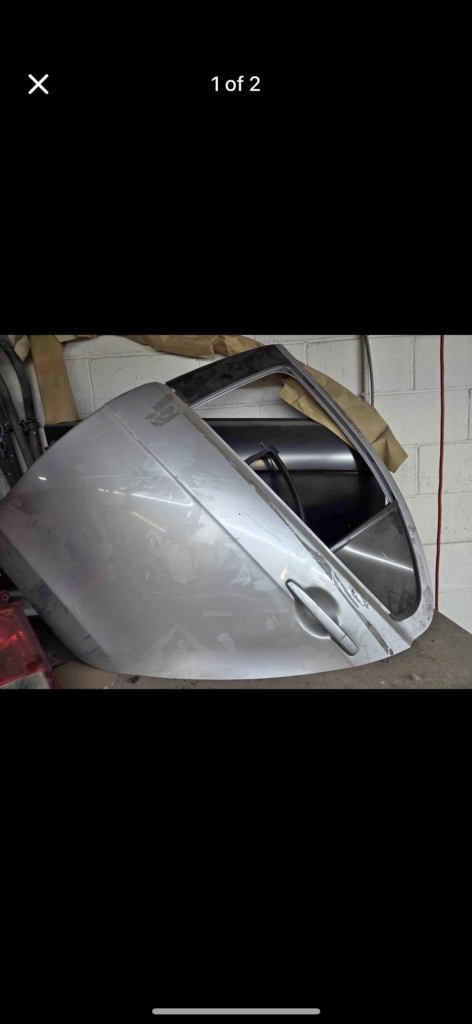
I finally found a painter who can paint the new door for $350. I had messaged countless people online and called up multiple garages, so after all that searching, this felt like the best deal I could get. It’s also reassuring that the painter had a lot of online reviews seeing other people’s experiences made me feel confident that I wasn’t getting overcharged and that the work would be done well.

The painter said the paint will take about a month to fully settle since I didn’t blend it in with the other panels. Also, because my car color is metallic, the paint cost a little extra.

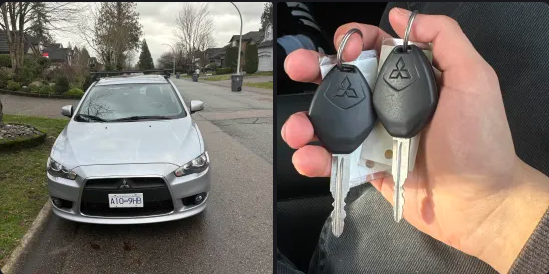
Overall, the final cost came to only $500, which still keeps my car under market value and with a clean title. Honestly, I feel like I scored a really good deal. Big thanks to ChatGPT and Reddit for helping me think through whether to buy the door or not!

I guess I now have a nice looking car that i bought for under market value. Yippee!!!!!!!

Free Inquiry Blog Post #7 – Car Mastery

Update!


I found a garage selling a brand-new OEM door for only $150. It’s unpainted, but it’s in perfect condition (the door in the back ^), which honestly makes it a really tempting option. At first, my plan was to just take a door off another car with the same color code, but that idea started to feel more complicated and stressful, especially after running into the wrong color code before.

Then I started thinking, what if I just buy this new door, swap the internals from my old one, and pay a painter to match the color? It might cost a bit more overall, but it seems like a safer and more reliable solution than hunting for the exact color online or taking risks with a used door. I’m starting to realize that sometimes it’s better to take a step back and think creatively instead of sticking to the first plan.

Now I just need to figure out how much painting will cost and whether I want to do it myself or hire someone, but at least it feels like I finally have a solid plan that could actually work.

Free Inquiry Blog Post #6 – Car Mastery

For my free inquiry, I looked into fixing a dent on my car that was already there when I bought it. The damage wasn’t reported, so the car still had a clean title, which is a big reason why I decided to buy it under market value. Before purchasing, I did some research and found out that replacement doors for my car are widely available, and it would only cost me under $700 to fix, which made the risk feel worth it.

I also researched on Facebook Marketplace for Mitsubishi Lancer parts, hoping to find a door that exactly matched my car’s color. However, I ran into an issue because my car’s color code is quite rare, which made it difficult to find a perfect match.

Originally, I thought I could just take the door off this car and fit it onto mine. However, when I went to see it in person, I realized the color code for that car was A32, while mine is A31 (aw man sucks!!!!).

In my next post, I’ll talk about whether I end up finding another door for my car or not.

Car Mastery 5 – Free Inquiry

After last week’s frustrating end, I was relieved to find that swapping out the faulty T-tap connectors did the trick. The new ones I ordered arrived and once I secured the connections properly, the backup camera finally came to life on the head unit display. Definitely a satisfying moment after all that troubleshooting.

With the camera actually working, the next step was getting the angle right. I had my friend sit in the car and give me real-time feedback while I adjusted the camera mount until we were both happy with the view. We then took it to an empty parking lot to fine tune it further, lining up the on-screen guidelines with the actual parking lines on the ground to make sure reversing would be accurate.

Finally we tackled cable management. All the wires are now fully tucked behind the weather stripping throughout the interior, keeping everything completely hidden and out of sight. No exposed cables, no mess, it looks completely clean like it came that way from the factory.

This week felt like the payoff for all the frustration from last week. The backup camera is fully installed, properly angled, and neatly hidden away. The Lancer is coming together nicely.

Car Mastery – Free Inquiry 4


For this post, I moved on to installing a backup camera on my Lancer. This was definitely a bigger challenge than the head unit because it involved running wires from the back of the car all the way to the dash. I used the video linked below as an installation guide.

I picked up a license plate mount to secure the camera in the ideal spot above the plate, giving me a clear view when reversing. Once mounted, I realized the cable from the camera was a bit too short to reach the dashboard, so I had to extend it using some spare wire I found in my dad’s garage. Using a T-tap connector, I joined the wires and made sure the connection was secure before moving on.

Next, I connected the main long cable to the reverse light so that the camera would turn on automatically when I put the car in reverse. Then came the tricky part: running the cable along the length of the car. I had to carefully tuck it under trim panels and along the edges of the interior, making sure nothing would get pinched or damaged while driving.

After running it to the new head unit that i had installed I tried to to put my car in reverse however i got no signal from the backup camera. I quickly tried to diagnose it and figured out that there could only be two reasons as to why. Either my T-Tap connections were not properly secured or the backup camera itself was faulty.

Thus I made sure my T-Tap connections were secured and then gave it a try, yet it did not work. I don’t think the backup camera itself was the issue as i tested it using a voltmeter so I would assume that the T-Tap i ordered off amazon were faulty sadly. Since it was getting late i opted to order some better quality T-Tap and try the installation next week.

At least my head unit was working so it wasn’t a complete loss this week!

Car Mastery – Free Inquiry 3


For this post, I finally got to the part I’ve been waiting for: installing the Head Unit on my Lancer. Below is the video i used as a guide throught the installation process.

Installing the new head unit started with removing parts of the dash to access the stock unit. First, I had to open the glove box and loosen two screws to get it out of the way. Once the glove box was removed, I tackled a plastic trim piece that runs along the dash. It was attached with clips, so I carefully used a pry tool to pop it off without breaking anything.

Next, I had to remove the hazard switch module, which was held in place by three screws. Once that was out, I carefully pried out the center console to create enough space to reach the head unit. This part was a little tricky, but taking it slow and making sure nothing was forced helped me avoid any scratches or broken clips.

Finally, I got to the head unit itself. It was held in by four screws, and after removing them, the old unit came out cleanly. I disconnected the cables from the old head unit and installed them in the new head unit. The installation process was quite easy as all the cables was plug and play. Below is a picture that I used to plug in the correct cables.

In the next post I will test the head unit and try to install the backup camera hopefully.

Car Mastery – Free Inquiry 2


My Lancer already has Bluetooth, which is great for music and calls, but it doesn’t have a built-in navigation system. Living in a new city like Vancouver without maps has been… awkward, to say the least. I’ve definitely gotten lost more times than I’d like to admit, and relying on my phone while driving just isn’t ideal.

That’s why I decided it was finally time to order a proper head unit with navigation. At first, I thought it would be as simple as picking any touchscreen, but there’s actually a lot to consider to make sure it fits my Lancer perfectly.

So I started looking at head units to add navigation. I narrowed it down to two options. The first one looked decent in the photos, but it bulged out a bit from the dash, which didn’t sit right with me. The second option was a smaller 9.1-inch screen, and after checking the customer reviews, it seemed to fit much better in the dash and had more of an OEM (original equipment manufacturer) look. I also made sure to get a model with a CANbus adapter. This is really important because it lets me still use my steering wheel controls with the new head unit, so I won’t lose any of the convenience I already have.

While searching for the right unit, I stumbled upon this YouTube video that replaces the head unit in a car exactly like mine (linked below). It was reassuring to see how the process works, and it gives me confidence to try installing it myself.

In my next post, I’ll attempt to install the new unit with my friend so hopefully everything goes well!

Car Mastery – Free Inquiry 1


For my free inquiry, I decided to write about my new car, which I picked up right after New Year’s. Growing up in Dubai, UAE, you can only get a license after turning 18. By the time I turned 18, I had moved to UVic for my higher education. After passing my driver’s test last summer in Vancouver, I finally saved up enough money over the fall semester to buy my first car!

Before picking a car, I made a list of what was important to me. First, I needed something reliable that wouldn’t constantly break down, since I’d be using it for school and commuting. I also wanted a car that was fun to drive and had some sporty appeal, not just something basic and boring. Maintenance and costs were also a factor, I wanted a car that I could afford to take care of on my own.

Since I’m still in university, I had to prioritize cheap and reliable, which meant ignoring the “fast” part of the car triangle. After comparing my options, I decided on the Mitsubishi Lancer, which struck the right balance of reliability, affordability, and sporty style that I was looking for.

I also researched about the common issues with the car to prepare myself about the money that i needed to reserve for maintenance costs. I also used ChatGPT to negotiate a price with the seller and to look for any important issues with the car.

I’ve always loved the red Mitsubishi Lancer Evo from Fast & Furious: Tokyo Drift, but obviously I don’t have the funds for an Evo so I’ll stick with the base Lancer (for now)

Anyways here is my new Lancer!

In my upcoming posts, I’ll be sharing the mods I plan to do on this car, such as installing a new head unit, adding a backup camera, and upgrading the interior lights. Doing these upgrades will help me learn more about my car and reduce the need to run to a mechanic for every minor issue, allowing me to handle things myself.